13 Dec 2010

St. Lucia Day

In spirit of St. Lucia day, I've chosen some of my most favorite scandinavian style items to feature!
Scandinavian Snowflake Gift Tags
gnome tea towel
Hand Screen Printed Patterned Stocking
Daisy bird cushion in teal on white linen
Meander original silkscreen print - mustard green Edition of 35
Fabric Tubby for Sharing, Snacking or Storage- Scandinavian Style Hearts
Swedish Branch Candle (Grenljus)
Pair of Mustard Yellow Dining Chairs
Handmade Messenger/Diaper Bag - Nouveau Blossom- Made to Order
Mid Century Danish Teak Chair with Aqua Seat
Scandinavian Christmas Candle Holders
Scandinavian style Floorcloth
Organic cotton dala horse tea towel red
Tiny Ingemar Swedish Horse Rubber Stamp

Last but not least, My own dalarna horsie! I've used him on a lot of Christmas ornaments and wrapping paper!! He looks extra handsome on felt;)
(an old pic my mom had of me doing the st. Lucia day routine-obviously we never took it very seriously as I think that it was the advent wreath that we used, and I was still in my work uniform...)

Christmas - Santa Lucia Sweden


For those of you who were wondering... "what the heck?" Why does
Corrabelle have a picture with candles on her head?

9 Dec 2010

Mrs. Wilson's Brood

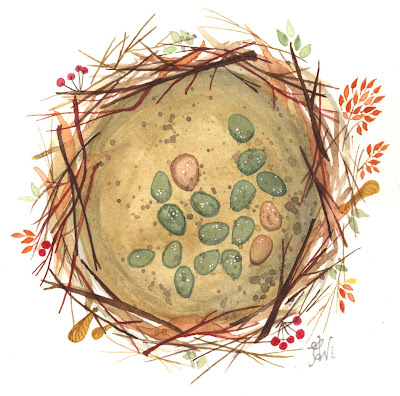
Just sharing a new original watercolor that I've listed in my shop- based on the tragedy of Mrs. Wilson.


Mrs. Wilson, you see, was our finch (or rather my sister's) who had such a compulsive need to lay eggs, yet none of them ever hatched.


However, she didn't seem to notice. She would simply carry on and building her nest.
 She and Mr. Wilson** would sit on their eggs, day and night, in hope that one might hatch. However, if an egg proved to be taking too long for their liking, it was tossed out of the nest and into the food dish.


**may Mr. Wilson rest in peace-we will discuss his suicide at a later date. It's much too soon to talk about it.
Mrs. Wilson is now happily settled in at a retirement home though, where she may meet another Mr. Wilson.


A side note: If any of you ever does have a finch who is a maniac egg layer, do not remove the eggs from the cage and leave them in a dish on the dining room table for observation. They so closely resemble cadbury mini-eggs and can be easily mistaken by an innocent (and later very disgusted) passer-by. Please don't risk it. I speak from experience.

7 Dec 2010


Happy Hanukkah from us to you!

1 Dec 2010

Watercolor winter wonderland

A quick post only to share a few recent designs for my Christmas cards being sold at


White backgrounds weren't actually an intentional theme, which is kind of funny because I normally don't leave such empty spaces. I find it refreshing though:)


9 Nov 2010

Retro Ornament Rubber Stamp Giveaway

The draw has been made for the winner
of last week's Giveaway!!

And the winner is....
.................................
......................................


Congrats! I'll be sending you an email shortly for your mailing address!
Check out Terrell's sweet site here


5 Nov 2010

Click your heels..

I've been trying to get my etsy art/print shop open again since being on vacation and I've been working on some new originals. So far though the gallery has been getting them all because it's a busy time of year and they're selling fast, but I'm hoping to have a few for my etsy shop soon too.        
Today I was missing Kansas a little so I painted this one. It's pretty tiny, only 4.5cm X 4.5cm, I blew it up slightly so that you could actually see it. 
This will be in the gallery on Monday, along with a couple more. I'll be sure to have some prints made for my shop though, and some new originals!

2 Nov 2010

Snowy Watercolours- A Simple Tutorial and a Memoir

It's getting awfully chilly around here, and although I haven't seen it myself yet, there are reports of the four letter word. SNOW!
I woke up to a thick layer of frost across our garden and felt that dreaded confirmation that winter is indeed on it's way. Autumn is my favorite season, and unfortunately it always feels so short, especially here in Ontario. If I had my way, I'd still be raking and rolling in leaves in December.

I remember back in southern Illinois when I was little, we went Christmas carolling just the night after we filled our ditches with freshly raked leaves and set them ablaze. Of course, we rolled around in them all afternoon before they were lit. (oh how i love that smell!) And being small, of course, It was easy to bury myself from head to toe.

And then we moved to Canada, to a townhouse with one pathetic freshly planted little maple tree.
My sister and I would wait anxiously for those spindly little leaves to finally drop. We'd make a little pile and attempt to jump in them, but who were we kidding?
If we had actually allowed ourselves to fall freely into this poor excuse of a pile, we would have broken our necks!

And to make matters worse, we usually didn't get a chance to make the pile before the condo maintenance men would come around with leaf blowers and blow what little hope we had right out into the street. (I hate leaf blowers, by the way. They're loud, and pointless! A vacuum would make more sense!)

It wasn't all bad though. We were opening a church that had a lot of property, and a lot of trees. We'd spend many weekends there while my parents were fixing up the building, and we had a lot of opportunity to make use of the leaves there.

 A bit later, we'd move into a house with a massive yard that had a huge maple, and plant even more. Autumn was never boring!

And one thing that Ontario did have that we'd never seen before was more snow than we knew what to do with. We would spend entire afternoons hollowing out the piles that the snow plows had left in our front yard, making forts, caves and tunnels.

For the record, (in case you were wondering,)  I recently walked by the old town house, around this time last year. That itty bitty maple now towers over the house, and then some, and has more than it's fair share of leaves. I hope there are children living there and loving that tree.

********************************************************************************
 I was just going to post a fun little beginner watercolor tutorial in theme with today's snow, but it turned into a story. So we'll call this part 2!
This is a fun little beginner lesson with masking fluid. It's pretty fast, and doesn't require a lot of skill-making it fun to do with children too!


 LE COURS D'INSTRUCTION
(the tutorial. I think?)

You will need:

I promise that i didn't steal this tray from Ikea. My friend Pleuntje gave it to me as a gift because she knows I'm obsessed with the place.
I can't guarantee though that she didn't steal it. (However, I'm fairly certain that she bought it, as ikea was selling them for a little while;)

A pencil
An Eraser
Paper
something thick weighted, preferably watercolor paper. I have done this with Bristol board though a couple of times back in an art class. It ends up looking a little different because it doesn't hold the paint the same, but it wouldn't be the end of the world if that's all you had;)
Paint brushes
some that you like, and some that are junky, that you don't mind possibly ruining. Dollar store ones will do! Even a Popsicle stick could work, with some determination and a bit of patience.
Masking Fluid
This is available at most art stores, and I've even seen it at Michael's, Joannes, and hobby lobby. So it isn't super hard to come by. Look for it with the watercolor paints.
Watercolor paints
even the cheap stuff will do for this project-of course quality watercolor paints are more rewarding. If you're doing this with kids, use the cheap stuff.
An old Toothbrush for "splattering" (optional.)
The first step is to draw out your large snowflakes. (There's no rule that you have to do snowflakes. If you want, do something else that's white. Like sheep, or stars!!)
I don't have a picture of my snowflakes at this point because I'm a bad teacher.
But basically, I drew out 4 snowflakes across the paper.

 If you wanted you could make paper snowflakes with scissors, and then trace those-and the little detailed cut outs in the centre as well!

Next, take the masking fluid. It smells like dead fish, I know. But it's worth it.

This is where you want to use brushes that you DO NOT CARE ABOUT. Masking fluid is weird stuff, it's a liquid rubber. It is possible to get the brushes clean later by using warm water and soap, but I wouldn't go using any kolinsky sable brushes with this stuff.
Fill in every space that you want to remain white (so, all the "snow") Be sure to leave small detail in your snow flakes blank if you want the watercolor background to show through later. Don't worry about the blue of the masking fluid, we'll remove it eventually.
Make sure that everything is covered with the masking fluid. You may have to look over it and spot touch anything that didn't get coated. It won't be perfectly even, some spots will be thicker. It doesn't really matter, so long as it's covered.
Now, if you like, you can use an old stiff bristled tooth brush to make some extra tiny white sprays around the snowflakes. Just dip the bristles into the masking fluid, and run you thumb quickly over the bristles, over the paper. Of course, you could do this manually with a tiny brush, if you're really bored.

Now for the fun part!

Completely coat your paper in whatever colours you like. (Yes, you can use your nice brushes now.) 
Experiment with different shades,  and blend away. You can make it as dark as you like, or light if you prefer. You don't have to be careful at all to "color in the lines" as the masking fluid is doing all the work for you. You can paint right over it if you like.
Once you're finished, do whatever touch ups you like, a second coat, some different colors, anything. But then let it dry completely. I know, it's hard to be patient, but you really don't want to do the next step until it's fully dry, or it will ruin your work, and your life.

(no, not really, Just your work. AND it will make you sad. I don't want you to be sad!)
l e t      i t      d r y !

Ok, now that it's dry, this is the really really fun part. Remember when you were little and your great aunt had peely wall paper that you were just dying to pick at? Now you have the opportunity to make up for lost time.

With your finger (not your fingernail, but your actual finger) start rubbing the edges of the masking fluid. (you can use an eraser too, if you like.)
It will start to roll back and ball up into stringy little rolls of rubbery fun.
Once you have a decent little edge pulled back, you can start to peel it off.

Peel off the rubber from all your snowflakes.
Next, get out an eraser, and begin to erase the little spray dots that you made with the tooth brush. You could do these all with your finger if you're a real glutton for punishment.

Also, now you can erase any pencil lines that might have been hiding under the masking fluid.
If there are any white spots that you didn't intend to be left white, you could touch them up now with a bit more paint.

And now you're finished! This would make a cute Christmas card, don't you think?


1 Nov 2010

Christmas Baubles Giveaway


I have some new retro ornament rubber stamps in my shop, and thought it would be fun to give away a set! There are no conditions for this giveaway-no need to follow my blog or "like" my facebook fan page-but feel free to do either if you wish.
The only rules are: One entry per person, and entries must be made from humans only. No pets posting on behalf of their masters. (hehe.)
Open internationally.
Contest will close at 11:59pm on Monday November 8th. The winner's name will be drawn at random and announced on Tuesday November 9th.

To enter, simply comment. Good luck!

30 Oct 2010

An Autumn Gathering

I went for a walk a few days ago with the boys to collect different leaves, and other tidbits and morsels that nature dishes out this time of year.
It started with acorns. There aren't a lot of oak trees in Hamilton, so I was giving the boys each a nickel for each complete acorn that they could find. I like having little dishes of the outdoors to sketch from.

But then we travelled down to Missouri a couple of weeks ago and hit the acorn jackpot. I had to stop handing out nickles eventually. (but yes, our acorn collection is plentiful;) Now they're on the hunt for berries, moss, fungus, leaves etc.

We arranged the colorful little pieces on a plate and it almost looked delicious enough to eat. (especially with the quail egg shells! We always have these on hand anyway, as Reuben and my niece are allergic to chicken eggs, these are their alternative. And really, they are so much cuter!)

We had a little watercolour party, inspired by our plate of goodies. The boys are still working on theirs, and are looking for even more to add to it.
I made a little nest out of the goodies, and can't wait to make some more. The colours were so inspiring!

This print is now available in my shop

29 Oct 2010

Sketchbook Project

I promise that I meant to mention this earlier. In case anyone is interested, there are only two days left to sign up for
the sketchbook project.

I ordered mine a little late, so I'll have a lot of sketching to do between now and January!

For my theme/topic, I picked "I'm a Scavenger". (oooh, so true) You should see the assortment of leaves, twigs, feathers, moss and fungus that I collected on today's walk...(actually, you  WILL see them in some upcoming artwork!)

The Sketchbook Project: 2011
If anyone feels like participating, sign up soon!
I'll be posting pics of mine as I go. I'd love to see yours!

5 Oct 2010

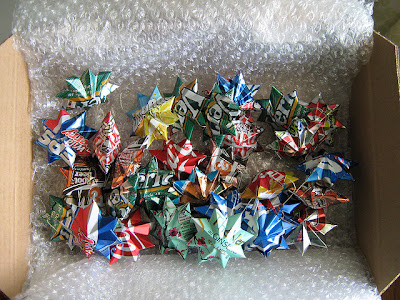
They're Back! Soda Can ornaments


People Magazine's Order when they featured my stars in 2008 in People Español and with Sabrina Soto on HGTV

It's that time of year again! The time where I get a craving for shiny metal paper cuts and force my friends and family to pack on a few pounds by drinking absurd amounts of these addictive beverages, so that I may keep the cans and make all sorts of sparkling beauties.

Ok..I kid, I kid. I'm actually really fortunate to live right next to Poco Loco, a fantastic Tex-Mex restaurant who's sweet owners allow me to raid their recycling bin on a weekly basis.

I have, however, gotten Mark to try different beers, based on the beauty of the cans. (Which is no worse than when he gets me to drink beer or pop based on the bottle so that he can make these... ) Let's just say as suckers for pretty packaging, we've tried some fairly putrid beverages, all for that shiny pink can or classy looking bottle with a painted label! Luckily, we've found a few that we do like as well!


These will be available in my shop until the 1st of December. I don't trust Canada Post's shipping past that point.

24 Aug 2010

"Well Poopsie, Ya got em".

Grandma & Poppie, 5 years ago at a "ho down" ;)

We're back from visiting family back home (Kansas) and starting to get back into the swing of things. I'm finally caught up on orders, now for the custom requests. (I received over 160 different requests for stamps while I was away.) Yikes. I have some work ahead of me!

We on a rather unplanned, last minute trip because my Grandma isn't doing very well.
She's had dementia now for quite a few years, but it's gotten really bad, really fast, and I wanted to see her again while she still remembers who I am.

Talking to Grandma has always taken a bit of training and guesswork,  for quite a few years, because she talks in so much slang and abbreviations that you have to guess at what she's saying.

For example, years ago, she'd ask me to get something from the pantry. (in their mud room.) I'd ask where it was.
 "just reach round' the corner and on that dodad. There ya be!" Little things like that. And these got even worse as her dementia has gotten worse.

She did remember me to some degree, but couldn't remember more recent things, like who my children were, or how many I even have. She'd ask me every 10 minutes if if any of the kids in the room were mine. How old were they? Were they boys or girls?

 I'd say "I have two boys, Grandma, they're right over there, the bouncy blond ones."
"oh, well I like that, that's just dandy", she'd say. "Now tell me, ya got me any more?"
"no Grandma, just the two".
"hm. Well that just won't do. I just, you know.."
 (she'd make a lot of hand movements at this point trying to find her words)
"i like a lot of em'. Cause ya know, when somethin' happens, well poopsie, ya got em' ."

 (Translation: If something should happen anyone in your family, you have a lot of other people to lean on. Now that she's older and is facing this really scary condition, she still has her eight children. If something should happen to one of her children, they still have other brothers and sisters to lean on.)

Then she pat my leg and said "well, hm. Yup!" and it was gone.
This was one of many short little conversations we had.

Another was about my skirt. She didn't like my skirt one bit. Well, she did. But the problem was, she thought it was an apron, and she thought it was odd that I was wearing it out of the house. (which I actually have done a few times, but that's besides the point.)

I had just arrived and she came slowly towards me and took off my sunglasses, and slowly realised who I was. She then pulled me over to two chairs and sat me in one, directly facing her, as though she were going to interview me. And that's exactly what she did.
First she said, pointing to my eyes, and then hers "you and me both, ya know?" (we both have blue eyes.) Then she slapped her leg and said "garsh darnit". She had lost her words again, and looked around helplessly, wringing her hands together.

Then she started tugging on my skirt and said "now tell me 'bout this. Why d'ya 'spose this happened? Is this somethin' the girls go for up there?" (I was surprised that she remembered that I'm in Canada now, actually.)
I said "oh, I don't know grandma. It's just a skirt. I guess it's a little colorful. I made it.."
She put her finger on her chin and raised an eyebrow and said
 "well, my mother, she used to...you know".
"Momo had a lot of aprons, didn't she?"
"yeah! all kinds. you know. I was just too hot, liked to be outside." (translation: She would have rather been outside on her tractor than inside, wearing an apron and cooking. Although, she did do a lot of that as well. Most of her favorite stories to tell are about when she and her cousin, "Arlie" were out on the tractor.)
"but this", she said, grabbing the edge of my skirt again, "so indoorsie. Not for church". (we weren't at church..but I didn't say anything about that!)

Then she looked at my nose ring (the tiniest stud ever, I swear!) and told me that I had a "boogie" and needed to "go get that fixed." Then she motioned to my Grandpa, pretended to use a cattle tagging gun in my nose, and laughed. He had a little chuckle over that too.

Poor Grandpa, I can't imagine how this would be for him. This was a good day too.
She has days where she's much more miserable, and won't take her medication, or wear her air cast (she has a badly sprained ankle and hobbles everywhere, but won't wear her air cast long enough to let it heal.)

She also thinks that doctors, medicine and air conditioning are the devil.
If we ever talk about medicine, vitamins, chiropractors or massage therapy in her presence, she starts humming this and making "jazz hands" and says "yeah, hokey pokey".
Translation: "it's hogwash. I never needed anything other than sunshine and pond water."

(which is also hogwash, Medicine really could have helped her, had she been on it a long time ago when she first started showing signs of dementia, but she would refuse to go to a doctor.)
She's also diabetic, so add that into the mix and Grandpa has a lot to deal with. Thank goodness one of my aunts is able to be there a lot with her, and help out, give him a little bit of relief.

I feel so bad that I can't be there more, I'm just so far away. Visiting always leaves me feeling a little easier in one sense, since I finally got to see everyone, but homesick too.

I just miss them all so much.

6 Jul 2010

What My Kids Did while at Church Camp...


An empty cabin, 5 boys, a creepy puppet, a porta potty and a video camera.
What a bunch of goofballs!


24 Jun 2010

And the Weeeeeener is...

So clearly my mind is completely messed up, and when I said I'd reveal the winner "tomorrow" what I really meant was "the day I believed to be Wednesday"..which is actually Thursday. Sorry girls.

So, without further hooplah...
the winner is...


drum roll...


Thanks so much to all who participated, twas fun! We shall do this again in July:)

21 Jun 2010

Quit Your Day Job! (ok, you twisted my arm..)


Just a little happy shout, I was featured on Etsy's Storque Spotlight for the "quit your day job" series.
You can read it here!

Also, don't forget to enter below for the giveaway! You have exactly 2.5 hours until the "ballot box" closes!

xo

14 Jun 2010

Oh Deerie Me, a Giveaway!

Just because I can, I'm giving away one of these sweet little Deary Dears, to one lucky reader!
This Giveaway is open to anyone, anywhere.
(does it bother anyone else that this is now commonly spelled "Giveaway" instead of "Give Away"?)

How it works:

  • For one Entry, Post a comment under this blog entry.

  • For Two Entries, Comment and "Follow" me.

  • For Three Entries, Comment, and Post a link to this Giveaway on your own blog!

(for those of you who already follow, yes, you already qualify as followers:)
This draw will take place at 8 pm on Monday,
June 21st.


Ready...
Set....


Go!

13 Jun 2010

Chandelier Tutorial

I'm in the process (if I can call it that, it's been a long while) of re-organizing my studio space.
When we moved in to this house last autumn, I was so relieved to finally  have some space dedicated to storing supplies and office space that I just sort of shoved everything in my approximate 12x9 room and closed the door.
It has a door.
This means that my work is no longer invading our living space, which is a huge welcome. I still smile about my door on a daily basis.

I realised though, I need a different sort of storage system. I need to take advantage of the ceiling height and free up more floor space. Currently, I'm using a myriad of vintage dining room furniture, a retro high back hutch, an old dining room table etc. *kinda-sorta* my style, sure, but not at all practical at all for storing art supplies.

I've been looking online at all sorts of beautifully decorated studios that seem to have all the storage and organization answers, but they often cost a fortune to actually build.

Beyond the antique style "built in" shelves with bead board trim that I dream about daily (usually as I'm grumbling about tripping over something that doesn't NEED to be stored in a box on the floor), I think about the decor of my future space.

While a chandelier wouldn't really be contributing to the general function of the room, I've wanted one for a while. Where else, after all, am I going to hang something this feminine in my male-infested home?
And, I have pretty decent lighting already. I'm a fan of my Ikea halogen track lights. They're practical, energy efficient, and they don't give me a headache.

But a Chandelier...

I found this tutorial today while perusing one of my favorite sites, Brassy Apple, and thought I would share. I thought this was a fantastic way to glam up a reading corner, or hang over my printing table!
It puts off no light, which is fantastic. I don't really need it too! And last but not least, no wiring for the Mister!

 I'm going to see if I can find the supplies to make this. I'll post a pic when I'm finished:) Now I just have to decide which color I want!

11 Jun 2010

Pretty Maids All in a Row... a Flower Tutorial


We used these watercolor flowers for our wedding, just to have some extras to decorate our tables and the window sills in the old barn where we held our reception.

Not only are they super easy, they're also really cheap to make! We only had to buy real flowers for bouquets. ( but you could use these for bouquets, really, if you wanted to!)
In bunches, they look like they were taken right out of one of Monet's paintings!

Grab your bridesmaids, and have a flower making party!

Materials:

Circular Coffee filters (3-6 per flower, the more filters, the fuller the flower)
Scissors
Staples/Stapler
Florist Tape
Florist Wire/Stems
Tubed watercolor paints or Food coloring
Spray Bottle
Clothes Line and Clothes Pins


Fold the filters in half and flatten out the "waves".


Cut Petals out of the wavy part, down to the flat bottom. You can cut a little deeper down if you like
but just be sure that you leave some form of a base.
If you cut the petals sort of long and skinny with pointy ends, they end up looking more like peonies.
If you cut them more curvy with a slight point, they end up looking more like a tea-cup rose!
Play around with it, there really isn't a right or wrong way. It just depends on the look you are going for.
You can cut a stack of 3 at a time no problem. I've done 6 which was a little tricky, but doable.
Separate the layers, and pull the centres down into a point, and gently fold the petals up.
 You can use the end of a pencil or a chopstick to do this if you want but it's really pretty simple. You don't need it to be a perfect uniform shape.

Take the first bunched up layer, and place it into the centre of the second layer. Again, fold up the petals of the second layer. Make sure that you're pinching both layers from the bottom.
Repeat, until you have as many layers as you like and the flowers are as full as you want them to be.
I sort of take the layers apart several times, turn them around etc to get the shape I want. (If I have time to be choosy!)
This step is one that I added after making a lot of these flowers and having a hard time relying florist's tape alone to hold them together. After adding the staple, they hold together so much better, both while coloring them and while using them to decorate.

Holding the bottom of the flower and pinching all layers, staple the layers together. Make sure the staple is vertical, in the direction that a natural stem would be. If it's horizontal you'll run into some problems later when we go to put them on the stems. Also be sure that you get the staple through each layer.

You can either color your flowers now (before putting the stems on) or after. I've done it both ways, and both ways work. If you want to color them first, the directions are below.
To add the stems, take the bottom of the flower and line up the staple with the stem. You'll want about an inch of stem in the flower itself.
Pinch the base of the flower around the stem. You will need to *ever-so-slightly* fold the entire flower around the wire as you do this. Once it's taped it will fall back to it's original shape.
Tape the flower by folding it around so that it just overlaps itself. Go around several times before moving down the stem. Make sure to go down the stem about an inch to be sure it's secure.

To colour your flowers, you'll need the spray bottle, and liquid watercolour paints.
This is doable with food coloring, although the color isn't quite as rich, unless you're
doing a darker color like red.
For the pink ones, I used a mixture of permanent rose and cadmium Red. For the yellow flowers I used yellow ochre and cadmium yellow, with a touch of burnt umber.
If you want, play around with colors first on paper (scraps of the coffee filters would work!) and see what you get.

Once you get your colors mixed the way you like them, add them to the bottom of your spray bottle, and dilute them with water. (You'll need about 1 cup of water for 60 flowers...so easy does it. No need to go overboard.)
Test your spray paint on some scraps and see if you need to add more paint to the water. If you like, add a touch of scent or essential oil to the paint if you want scented flowers.

Put on an old t-shirt for this part. You're bound to get a little bit of paint on yourself with this part.

Take your flowers and your spray paint outside. (make sure it's not going to rain, as you'll need some time for these to dry. They dry really quickly in the sun.)
Hold your flower an arms length away and spray the flower from the centre, working your way out. Some of the paint will cause the petals to stick together a bit. Just separate them with your fingers and be sure to get the paint right down to the centre of the flower.

If you've already put on the stems, just fold the stems over the clothesline and let them hang upside down.
If you haven't put the stems on, Just pin them by the base (on the staple) so that they're facing down.
The reason you want them facing down, is because the paint will run to the edges of the paper, making them look all that more real once they're dried. It's really noticeable in the darker colors like pink and red. (see the pink flower below?)
They only take about an hour to dry on a sunny day. Make sure they're completely dry before putting the stems on, if you haven't already.


Voila! Pretty, Affordable, and they never wilt! Either save them for later use, or send them home with you guests:)